Rumba
About Rumba
Rumba is a Python framework for setting up Ouroboros (and RINA) networks in a test environment that was originally developed during the ARCFIRE project. Its main objectives are to configure networks and to evaluate a bit the impact of the architecture on configuration management and devops in computer and telecommunications networks. The original Rumba project page is here.
I still use Rumba to quickly (and I mean in a matter of seconds!) set up test networks for Ouroboros that are made up of many IPCPs and layers. I try to keep it up-to-date for the Ouroboros prototype.
The features of Rumba are:
- easily define network topologies
use different prototypes]:
- Ouroboros1
- rlite
- IRATI
create these networks using different possible environments:
- local PC (Ouroboros only)
- docker container
- virtual machine (qemu)
- jFed testbeds
script experiments
rudimentary support for drawing these networks (using pydot)
Getting Rumba
We forked Rumba with to the Ouroboros website, and you should get this forked version for use with Ouroboros. It should work with most python versions, but I recommend using the latest version (currently Python3.9).
To install system-wide, use:
git clone https://ouroboros.rocks/git/rumba
cd rumba
sudo ./setup.py install
or you can first create a Python virtual environment as you wish.
Using Rumba
The Rumba model is heavily based on RINA terminology (since it was originally developed within a RINA research project). We will probably align the terminology in Rumba with Ouroboros in the near future. I will break down a typical Rumba experiment definition and show how to use Rumba in Python interactive mode. You can download the complete example experiment definition here. The example uses the Ouroboros prototype, and we will run the setup on the local testbed since that is available on any machine and doesn’t require additional dependencies. We use the local testbed a lot for quick development testing and debugging. I will also show the experiment definition for the virtual wall server testbed at Ghent University as an example for researchers who have access to this testbed. If you have docker or qemu installed, feel free to experiment with these at your leisure.
Importing the needed modules and definitions
First, we need to import some definitions for the model, the testbed and the prototype we are going to use. Rumba defines the networks from the viewpoint of the layers and how they are implemented present on the nodes. This was a design choice by the original developers of Rumba.
Three elements are imported from the rumba.model module:
from rumba.model import Node, NormalDIF, ShimEthDIFNode is a machine that is hosting the IPCPs, usually a server. In the local testbed it is a purely abstract concept, but when using the qemu, docker or jfed testbeds, each Node will map to a virtual machine on the local host, a docker container on the local host, or a virtual or physical server on the jfed testbed, respectively.
NormalDIF is (roughly) the RINA counterpart for an Ouroboros unicast layer. The Rumba framework has no support for broadcast layers (yet).
ShimEthDIF is (roughly) the RINA counterpart for an Ouroboros Ethernet IPCP. These links make up the “physical network topology” in the experiment definition. On the local testbed, Rumba will use the ipcpd-local as a substitute for the Ethernet links, in the other testbeds (qemu, docker, jfed) these will be implemented on (virtual) Ethernet interfaces. Rumba uses the DIX ethernet IPCP (ipcpd-eth-dix) for Ouroboros as it has the least problems with cheaper switches in the testbeds that often have buggy LLC implementations.
You might have expected that IPCPs themselves would be elements of the Rumba model, and they are. They are not directly defined but, as we shall see in short, inferred from the layer definitions.
We still need to import the testbeds we will use. As mentioned, we will use the local testbed and jfed testbed. The commands to import the qemu and docker testbed plugins are shown in comments for reference:
import rumba.testbeds.jfed as jfed
import rumba.testbeds.local as local
# import rumba.testbeds.qemu as qemu
# import rumba.testbeds.dockertb as docker
And finally, we import the Ouroboros prototype plugin:
import rumba.prototypes.ouroboros as ourAs the final preparation, let’s define which variables to export:
__all__ = ["exp", "nodes"]exp will contain the experiment definition for the local testbed
nodes will contain a list of the node names in the experiment, which will be of use when we drive the experiment from the IPython interface.
Experiment definition
We will now define a small 4-node “star” topology of two client nodes, a server node, and a router node, that looks like this:
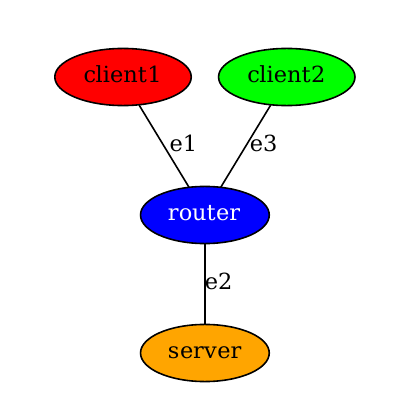
In the prototype, there is a unicast layer which we call n1 (in Rumba, a “NormalDIF”) and 3 point-to-point links (“ShimEthDIF”), e1, e2 and e3. There are 4 nodes, which we label “client1”, “client2”, “router”, and “server”. These are connected in a so-called star topology, so there is a link between the “router” and each of the 3 other nodes.
These layers can be defined fairly straightforward as such:
n1 = NormalDIF("n1")
e1 = ShimEthDIF("e1")
e2 = ShimEthDIF("e2")
e3 = ShimEthDIF("e3")
And now the actual topology definition, the above figure will help making sense of this.
clientNode1 = Node("client1",
                   difs=[e1, n1],
                   dif_registrations={n1: [e1]})

clientNode2 = Node("client2",
                   difs=[e3, n1],
                   dif_registrations={n1: [e3]})

routerNode = Node("router",
                  difs=[e1, e2, e3, n1],
                  dif_registrations={n1: [e1, e2, e3]})

serverNode = Node("server",
                  difs=[e2, n1],
                  dif_registrations={n1: [e2]})

nodes = ["client1", "client2", "router", "server"]
Each node is modeled as a Rumba Node object, and we specify which difs are present on that node (which will cause Rumba to create an IPCP for you) and how these DIFs relate to eachother in that node. This is done by specifying the dependency graph between these DIFs as a dict object (“dif_registrations”) where the client layer is the key and the list of lower-ranked layers is the value.
The endpoints of the star (clients and server) have a fairly simple configuration: They are connected to the router via an ethernet layer (e1 on “client1”, e3 on “client2” and e2 on “server”, and then the “n1” sits on top of that. So for node “client1” there are 2 layers present (difs=[e1, n1]) and n1 makes use of e1 to connect into the layer, or in other words, n1 is registered in the lower layer e1 (dif_registrations={n1: [e1]}.
The router node is similar, but of course, all the ethernet layers are present and layer n1 has to be known from all other nodes, so on the router, n1 is registered in [e1, e2, e3].
All this may look a bit unfamiliar and may take some time to get used to (and maybe an option for Rumba where the experiment is defined in terms of the IPCPs rather than the layers/DIFs might be more intuitive), but once one gets the hang of this, defining complex network topologies really becomes childs play.
Now that we have the experiment defined, let’s set up the testbed.
For the local testbed, there is literally almost nothing to it:
tb = local.Testbed()
exp = our.Experiment(tb,
                     nodes=[clientNode1,
                            clientNode2,
                            routerNode,
                            serverNode])
We define a local.Testbed and then create an Ouroboros experiment (recall we imported the Ouroboros plugin as our) using the local testbed and pass the list of nodes defined for the experiment. For the local testbed, that literally is it. The local testbed module will not perform installations on the host machine and assumes Ouroboros is installed and running.
An example on the Fed4FIRE/GENI testbeds using the jFed plugin
Before using Rumba with jFed, you need to enable ssh-agent in each terminal.
eval `ssh-agent`
ssh-add /path/to/cert.pem
To give an idea of what Rumba can do on a testbed with actual hardware servers, I will also give an example for a testbed deployment using the jfed plugin. This may not be relevant to people who don’t have access to these testbeds, but it can server as a taste for what a kubernetes2 plugin can achieve, which may come if there is enough interest for it.
jfed_tb = jfed.Testbed(exp_name='cc2',
                       cert_file='/path/to/cert.pem',
                       authority='wall1.ilabt.iminds.be',
                       image='UBUNTU16-64-STD',
                       username='<my_username>',
                       passwd='<my_password>',
                       exp_hours='1',
                       proj_name='ouroborosrocks')
The jfed testbed requires a bit more configuration than the local (or qemu/docker) plugins. First, the credentials for accessing jfed (your username, password, and certificate) need to be passed. Your password is optional, and if you don’t like supplying it in plaintext, Rumba will ask you to enter it at certain occasions. A jFed experiment requires an experiment name that can be chosen at will for the experiment, an experation time (in hours) and also a project name that has to be created within the jfed portal and pre-approved by the jfed project. Finally, the authority specifies the actual test infrastructure to use, in this case wall1.ilabt.iminds.be is a testbed that consist of a large number of physical server machines. The image parameter specifies which OS to run, in this case, we selected Ubuntu 16.04 LTS. For IRATI we used an image that had the prototype pre-installed.
More interesting than the testbed configuration is the additional functionality for the experiment:
jfed_exp = our.Experiment(jfed_tb,
                          nodes=[clientNode1,
                                 clientNode2,
                                 routerNode,
                                 serverNode],
                          git_repo='https://ouroboros.rocks/git/ouroboros',
                          git_branch='<some working branch>',
                          build_options='-DCMAKE_BUILD_TYPE=Debug '
                                        '-DSHM_BUFFER_SIZE=131072',
                          add_packages=['ethtool'],
                          influxdb={
                              'ip': '<my public IP address>',
                              'port': 8086,
                              'org': "Ouroboros",
                              'token': "<my token>"
                          })
For these more beefy setups, Rumba will actually install the prototype and you can specify a repository and branch (if not, it will use the master branch from the main ouroboros repository), build options for the prototype, additional packages to install for use during the experiment and as a specific option for Ouroboros the coordinates for an influxDB database, which will also install the metrics exporter and allow realtime observation of key experiment parameters.
This concludes the brief overview of the experiment definition, let’s give it a quick try using the “local” testbed.
Interactive orchestration
First, make sure that Ouroboros is running your host machine, save the experiment definition script to your machine and run a python shell in the directory with the example file.
Let’s first add some additional logging to Rumba so we have a bit more information about the process:
[dstaesse@heteropoda examples]$ python
Python 3.9.6 (default, Jun 30 2021, 10:22:16)
[GCC 11.1.0] on linux
Type "help", "copyright", "credits" or "license" for more information.
>>> import rumba.log as log
>>> log.set_logging_level('DEBUG')
Now, in the shell, import the definitions from the example file. I will only put (and reformat) the most important snippets of the output here.
>>> from rumba_example import *

DIF topological ordering: [DIF e2, DIF e1, DIF e3, DIF n1]
DIF graph for DIF n1: client1 --[e1]--> router,
                      client2 --[e3]--> router,
                      router --[e1]--> client1,
                      router --[e3]--> client2,
                      router --[e2]--> server,
                      server --[e2]--> router
Enrollments:
    [DIF n1] n1.router --> n1.client1 through N-1-DIF DIF e1
    [DIF n1] n1.client2 --> n1.router through N-1-DIF DIF e3
    [DIF n1] n1.server --> n1.router through N-1-DIF DIF e2

Flows:
    n1.router --> n1.client1
    n1.client2 --> n1.router
    n1.server --> n1.router
When an experiment object is created, Rumba will pre-compute how to bootstrap the requested network layout. First, it will select a topological ordering, the order in which it will create the layers (DIFs). We now only have 4, and the Ethernet layers need to be up and running before we can bootstrap the unicast layer n1. Rumba will create them in the order e2, e1, e3 and then n1.
The graph for N1 is shown as a check that the correct topology was input. Then Rumba shows the ordering it which it will enroll the members of the n1 layer.
As mentioned above, Rumba creates IPCPs based on the layering
information in the Node objects in the experiment description. The
naming convention used in Rumba is “
Finally, it will create 3 flows between the members of n1 that will complete the “star” topology. Note that in Ouroboros, there will actually be 6, as it will have 3 data flows (for all traffic between clients of the layer, the directory (DHT), etc) and 3 flows for management traffic (link state advertisements).
It is possible to print the layer graph (DIF graph) as an image (PDF) for easier verification that the topology is correct. For instance, for the unicast layer n1:
>>> from rumba_example import n1
>>> exp.export_dif_graph("example.pdf", n1)
>>> <snip> Generated PDF of DIF graph
This is actually how the image above was generated.
The usual flow for starting an experiment is to call the
exp.swap_in()
exp.install_prototype()
functions. The swap_in() function prepares the testbed by booting the (virtual) machines or containers. The install_prototype call will install the prototype of choice and all its dependencies and tools. However, we are now using a local testbed, and in this case, these two functions are implemented as nops, allowing to use the same script on different types of testbeds.
Now comes the real magic (output cleaned up for convenience). The _bootstrapprototype() function will create the defined network topology on the selected testbed. For the local testbed, all hosts are the same, so client1/client2/router/server will actually execute on the same machine. The only difference in these commands, should for instance a virtual wall testbed be used, is that the ‘type local’ IPCPs would be ‘type eth-dix’ and be configured on an Ethernet interface, and of course be run on the correct host machine. It is also what a network administrator would have to execute if he or she were to create the network manually on physical or virtual machines.
This is one of the key strenghts of Ouroboros: it doesn’t care about machines at all. It’s a network of software objects, or even a network of algorithms, not a network of devices. It needs devices to run, of course, but the device, nor the interface is a named entity in any of the objects that make up the actual network. The devices are a concern for the network architect and the network manager, as they choose where to run the processes that make up the network and monitor them, but devices are irrelevant for the operation of the network in itself.
Anyway, here is the complete output of the bootstrap_prototype() command, I’ll break it down a bit below.
>>> exp.bootstrap_prototype()
16:29:28 Starting IRMd on all nodes...
[sudo] password for dstaesse:
16:29:32 Started IRMd, sleeping 2 seconds...
16:29:34 Creating IPCPs
16:29:34 client1 >> irm i b n e1.client1 type local layer e1
16:29:34 client1 >> irm i b n n1.client1 type unicast layer n1 autobind
16:29:34 client2 >> irm i b n e3.client2 type local layer e3
16:29:34 client2 >> irm i c n n1.client2 type unicast
16:29:34 router >> irm i b n e1.router type local layer e1
16:29:34 router >> irm i b n e3.router type local layer e3
16:29:34 router >> irm i b n e2.router type local layer e2
16:29:34 router >> irm i c n n1.router type unicast
16:29:34 server >> irm i b n e2.server type local layer e2
16:29:34 server >> irm i c n n1.server type unicast
16:29:34 Enrolling IPCPs...
16:29:34 client1 >> irm n r n1.client1 ipcp e1.client1
16:29:34 client1 >> irm n r n1 ipcp e1.client1
16:29:34 router >> irm n r n1.router ipcp e1.router ipcp e2.router ipcp e3.router
16:29:34 router >> irm i e n n1.router layer n1 autobind
16:29:34 router >> irm n r n1 ipcp e1.router ipcp e2.router ipcp e3.router
16:29:34 client2 >> irm n r n1.client2 ipcp e3.client2
16:29:34 client2 >> irm i e n n1.client2 layer n1 autobind
16:29:34 client2 >> irm n r n1 ipcp e3.client2
16:29:34 server >> irm n r n1.server ipcp e2.server
16:29:34 server >> irm i e n n1.server layer n1 autobind
16:29:34 server >> irm n r n1 ipcp e2.server
16:29:34 router >> irm i conn n n1.router dst n1.client1
16:29:34 client2 >> irm i conn n n1.client2 dst n1.router
16:29:34 server >> irm i conn n n1.server dst n1.router
16:29:34 All done, have fun!
16:29:34 Bootstrap took 6.05 seconds
First, the prototype is started if it is not already running:
16:29:28 Starting IRMd on all nodes...
[sudo] password for dstaesse:
16:29:32 Started IRMd, sleeping 2 seconds...
Since starting the IRMd requires root privileges, Rumba will ask for your password.
Next, Rumba will create the IPCPs on each node, I will go more in-depth for client1 and client2 as they bring some interesting insights:
16:29:34 Creating IPCPs
16:29:34 client1 >> irm i b n e1.client1 type local layer e1
16:29:34 client1 >> irm i b n n1.client1 type unicast layer n1 autobind
16:29:34 client2 >> irm i b n e3.client2 type local layer e3
16:29:34 client2 >> irm i c n n1.client2 type unicast
First of all there are two different choices of commands, the
bootstrap commands starting with irm i b and the
create commands starting with irm i c. If you know the CLI a
bit (you can find out more using man ouroboros from the command
line when Ouroboros is installed), you already know that these are
shorthand for
irm ipcp bootstrap
irm ipcp create
If the IPCP doesn’t exist, the irm ipcp bootstrap call will
automatically first create an IPCP behind the screens using an irm
ipcp create call, so this is nothing but a bit of shorthand.
Ouroboros will create the IPCPs that will enroll, and immediately
bootstrap those that won’t. The Ethernet IPCPs are simple: they always
are bootstrapped and cannot be enrolled as the configuration is
manual and may involve Ethernet switches; Ethernet IPCPs do not
support the irm ipcp enroll method. For the unicast IPCPs that
make up the n1 layer, the situation is different. As mentioned
above, the first IPCP in that layer is bootstrapped, “n1.client1” and
then other members of the layer are enrolled to extend that layer. So
if you turn your attention back to the full listing of the steps
executed by the bootstrap() procedure in Rumba, you will now see that
there are only 3 IPCPs that are created using irm i c: those 3
that are selected for enrollment, which is the next step.
Here Ouroboros deviates quite a bit from RINA, as what RINA calls enrollment is actually split into 3 different phases in Ouroboros. But as Rumba was intended to work with RINA (a requirement for the ARCFIRE project at hand) this is a single “step” in Rumba. In RINA, the DIF registrations are initiated by the IPCPs themselves, which means making APIs and what not to feed all this information to the IPCPs and let them execute this. Ouroboros, on the other hand, keeps things lean by moving registration operations into the hands of the network manager (or network management system). The IPCP processes can be registered and unregistered as clients for lower layers at will without any need to touch them. Let’s have a look at the commands, of which there are 3:
irm n r     # shorthand for irm name register
irm i e     # shorthand for irm ipcp enroll
irm i conn  # shorthand for irm ipcp connect
Rumba will need to make sure that the n1 IPCPs are known in the (Ethernet) layer below, and that they are operational before another n1 IPCP tries to enroll with it. There are interesting things to note:
First, looking at the “n1.client1” IPCP, it is registered with the e1 layer twice (I reformatted the commands for clarity):
16:29:34 client1 >> irm n r n1.client1 ipcp e1.client1
16:29:34 client1 >> irm n r n1         ipcp e1.client1
Once under the “n1.client1” name (which is the name of the IPCP) and once under the more general “n1” name, which is actually the name of the layer.
In addition, if we scout out the n1 name registrations, we see that it is registered in all Ethernet layers (reformatted for clarity) and on all machines:
16:29:34 client1 >> irm n r n1 ipcp e1.client1
16:29:34 router  >> irm n r n1 ipcp e1.router ipcp e2.router ipcp e3.router
16:29:34 client2 >> irm n r n1 ipcp e3.client2
16:29:34 server  >> irm n r n1 ipcp e2.server
This is actually Ouroboros anycast at work, and this allows us to make the enrollment commands for the IPCPs really simple (reformatted for clarity):
16:29:34 router  >> irm i e n n1.router   layer n1  autobind
16:29:34 client2 >> irm i e n n1.client2  layer n1  autobind
16:29:34 server  >> irm i e n n1.server   layer n1  autobind
By using an anycast name (equal to the layer name) for each IPCP in the n1 layer, we can just tell an IPCP to “enroll in the layer” and it will enroll with any IPCP in that layer. This simplifies things for human administrators not having to know the names for reachable IPCPs in the layer they want to enroll with (although, of course, Rumba does have this information from the experiment definition and we could have specified a specific IPCP just as easily). If the enrollment with the destination layer fails, it means that none of the members of that layer are reachable.
The “autobind” directive will automatically bind the process to accept flows for the ipcp name (e.g. “n1.router”) and the layer name (e.g. “n1”).
The last series of commands are the
irm ipcp connect
commands. Ouroboros splits the topology definition (forwarding adjacencies in IETF speak) from enrollment. So after an IPCP is enrolled with the layer and knows the basic information to operate as a peer router, it will break all connections and wait for a specific adjacency to be made for data transfer and for management. The command above just creates them both in parallel. We may create a shorthand to create these connections with the IPCP that was used for enrollment.
Let’s ping the server from client1 using the Rumba storyboard.
>>> from rumba.storyboard import *
>>> sb = StoryBoard(experiment=exp, duration=1500, servers=[])
>>> sb.run_command("server",
                   'irm bind prog oping name oping_server;'
                   'irm name register oping_server layer n1;'
                   'oping --listen > /dev/null 2>&1 &')
18:04:33  server >> irm bind prog oping name oping_server;
                    irm name register oping_server layer n1;
                    oping --listen > /dev/null 2>&1 &
>>> sb.run_command("client1", "oping -n oping_server -i 10ms -c 100")
18:05:26 client1 >> oping -n oping_server -i 10ms -c 100
The same experiment on jFed
The exp.swap_in() and exp.install_prototype() will reserve
and boot the servers on the testbed and install the prototype on each
of them. Let’s just focus on the prototype itself and see of you can
spot the differences (and the similarities!) between the (somewhat
cleaned up) output for running the exact same bootstrap command as
above using physical servers on the jFed virtual wall testbed compared
to the test on a local machine.
>>> exp.bootstrap_prototype()
18:26:15 Starting IRMd on all nodes...
18:26:15 n078-05 >> sudo nohup irmd > /dev/null &
18:26:15 n078-09 >> sudo nohup irmd > /dev/null &
18:26:15 n078-03 >> sudo nohup irmd > /dev/null &
18:26:15 n078-07 >> sudo nohup irmd > /dev/null &
18:26:16 Creating IPCPs
18:26:16 n078-05 >> irm i b n e1.client1 type eth-dix dev enp9s0f0 layer e1
18:26:16 n078-05 >> irm i b n n1.client1 type unicast layer n1 autobind
18:26:17 n078-09 >> irm i b n e3.client2 type eth-dix dev enp9s0f0 layer e3
18:26:17 n078-09 >> irm i c n n1.client2 type unicast
18:26:17 n078-03 >> irm i b n e3.router type eth-dix dev enp8s0f1 layer e3
18:26:17 n078-03 >> irm i b n e1.router type eth-dix dev enp0s9 layer e1
18:26:17 n078-03 >> irm i b n e2.router type eth-dix dev enp9s0f0 layer e2
18:26:17 n078-03 >> irm i c n n1.router type unicast
18:26:17 n078-07 >> irm i b n e2.server type eth-dix dev enp9s0f0 layer e2
18:26:17 n078-07 >> irm i c n n1.server type unicast
18:26:17 Enrolling IPCPs...
18:26:17 n078-05 >> irm n r n1.client1 ipcp e1.client1
18:26:17 n078-05 >> irm n r n1 ipcp e1.client1
18:26:18 n078-03 >> irm n r n1.router ipcp e1.router ipcp e2.router ipcp e3.router
18:26:18 n078-03 >> irm i e n n1.router layer n1 autobind
18:26:20 n078-03 >> irm n r n1 ipcp e1.router ipcp e2.router ipcp e3.router
18:26:20 n078-09 >> irm n r n1.client2 ipcp e3.client2
18:26:20 n078-09 >> irm i e n n1.client2 layer n1 autobind
18:26:20 n078-09 >> irm n r n1 ipcp e3.client2
18:26:20 n078-07 >> irm n r n1.server ipcp e2.server
18:26:20 n078-07 >> irm i e n n1.server layer n1 autobind
18:26:20 n078-07 >> irm n r n1 ipcp e2.server
18:26:20 n078-03 >> irm i conn n n1.router dst n1.client1
18:26:24 n078-09 >> irm i conn n n1.client2 dst n1.router
18:26:25 n078-07 >> irm i conn n n1.server dst n1.router
18:26:All done, have fun!
18:26:25 Bootstrap took 9.57 seconds
Anyone who has been configuring distributed services in datacenter and ISP networks should be able to appreciate the potential for the abstractions provided by the Ouroboros model to make life of a network administrator more enjoyable.