Local test
This tutorial runs through the basics of Ouroboros. Here, we will see the general use of two core components of Ouroboros, the IPC Resource Manager daemon (IRMd) and an IPC Process (IPCP).
It is recommended to use a Debug build for this tutorial to show extra IRMd output. To do this, compile with the CMAKE_BUILD_TYPE set to “Debug”. For a full list of build options and how to activate them, see here.
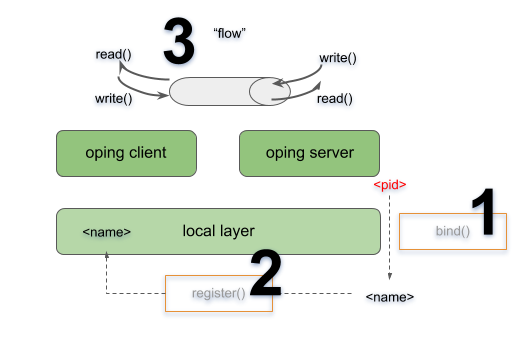
We will start the IRMd, create a local IPCP, start a ping server and connect a client. This will involve binding (1) that server to a name and registering (2) that name into the local layer. After that the client will be able to allocate a flow (3) to that name for which the server will respond.
We recommend to open 3 terminal windows for this tutorial. In the first window, start the IRMd (as a superuser) in stdout mode. The output shows the process id (pid) of the IRMd, which will be different on your machine.
$ sudo irmd --stdout
==02301== irmd(II): Ouroboros IPC Resource Manager daemon started\...
The type of IPCP we will create is a “local” IPCP. The local IPCP is a kind of loopback interface that is native to Ouroboros. It implements all the functions that the Ouroboros API provides, but only for a local scope. The IPCP create function will instantiate a new local IPC process, which in our case has pid 2324. The “ipcp create” command merely creates the IPCP. At this point it is not a part of a layer. We will also need to bootstrap this IPCP in a layer, we will name it “local_layer”. As a shortcut, the bootstrap command will automatically create an IPCP if no IPCP by than name exists, so in this case, the IPCP create command is optional. In the second terminal, enter the commands:
$ irm ipcp create type local name local_ipcp
$ irm ipcp bootstrap type local name local_ipcp layer local_layer
The IRMd and ipcpd output in the first terminal reads:
==02301== irmd(II): Created IPCP 2324.
==02324== ipcpd-local(II): Bootstrapped local IPCP with pid 2324.
==02301== irmd(II): Bootstrapped IPCP 2324 in layer local_layer.
From the third terminal window, let’s start our oping application in server mode (“oping –help” shows oping command line parameters):
$ oping --listen
Ouroboros ping server started.
The IRMd will notice that an oping server has started. In our case it has pid 2337, but this will be different on your system:
==02301== irmd(DB): New instance (2337) of oping added.
==02301== irmd(DB): This process accepts flows for:
If you are not running a debug build, you won’t see this output and will have to look for the pid of the process using a linux command such as ps.
$ ps ax | grep oping
   2337 pts/4    Sl+    0:00 oping --listen
The server application is not yet reachable by clients. Next we will bind the server to a name and register that name in the “local_layer”. The name for the server can be chosen at will, let’s take “oping_server”. In the second terminal window, execute:
$ irm bind proc 2337 name oping_server
$ irm name register oping_server layer local_layer
The IRMd and IPCPd in terminal one will now acknowledge that the name is bound and registered:
==02301== irmd(II): Bound process 2337 to name oping_server.
==02324== ipcpd-local(II): Registered 4721372d.
==02301== irmd(II): Registered oping_server in local_layer as
4721372d.
Ouroboros registers name not in plaintext but using a (configurable) hashing algorithm. The default hash is a 256 bit SHA3 hash. The output in the logs is truncated to the first 4 bytes in a HEX notation.
Now that we have bound and registered our server, we can connect from the client. In the second terminal window, start an oping client with destination oping_server and it will begin pinging:
$ oping -n oping_server -c 5
Pinging oping_server with 64 bytes of data:

64 bytes from oping_server: seq=0 time=0.694 ms
64 bytes from oping_server: seq=1 time=0.364 ms
64 bytes from oping_server: seq=2 time=0.190 ms
64 bytes from oping_server: seq=3 time=0.269 ms
64 bytes from oping_server: seq=4 time=0.351 ms

--- oping_server ping statistics ---
5 SDUs transmitted, 5 received, 0% packet loss, time: 5001.744 ms
rtt min/avg/max/mdev = 0.190/0.374/0.694/0.192 ms
The server will acknowledge that it has a new flow connected on flow descriptor 64, which will time out a few seconds after the oping client stops sending:
New flow 64.
Flow 64 timed out.
The IRMd and IPCP logs provide some additional output detailing the flow allocation process:
==02324== ipcpd-local(DB): Allocating flow to 4721372d on fd 64.
==02301== irmd(DB): Flow req arrived from IPCP 2324 for 4721372d.
==02301== irmd(II): Flow request arrived for oping_server.
==02324== ipcpd-local(II): Pending local allocation request on fd 64.
==02301== irmd(II): Flow on port_id 0 allocated.
==02324== ipcpd-local(II): Flow allocation completed, fds (64, 65).
==02301== irmd(II): Flow on port_id 1 allocated.
==02301== irmd(DB): New instance (2337) of oping added.
==02301== irmd(DB): This process accepts flows for:
==02301== irmd(DB): oping_server
First, the IPCPd shows that it will allocate a flow towards a destination hash “4721372d” (truncated). The IRMd logs that IPCPd 2324 (our local IPCPd) requests a flow towards any process that is listening for “4721372d”, and resolves it to “oping_server”, as that is a process that is bound to that name. At this point, the local IPCPd has a pending flow on the client side. Since this is the first port_id in the system, it has port_id 0. The server will accept the flow and the other end of the flow gets port_id 1. The local IPCPd sees that the flow allocation is completed. Internally it sees the endpoints as flow descriptors 64 and 65 which map to port_id 0 and port_id 1. The IPCP cannot directly access port_ids, they are assigned and managed by the IRMd. After it has accepted the flow, the oping server enters flow_accept() again. The IRMd notices the instance and reports that it accepts flows for “oping_server”.
This concludes this first short tutorial. All running processes can be terminated by issuing a Ctrl-C command in their respective terminals or you can continue with the next tutorial.